Happy Wednesday?!!! I am going to be completely honest with you. I had to check the calendar and the date on my computer to make sure that it was indeed a Wednesday! Oh, these are crazy times! I was absolutely, posititvely so happy when I saw that Whimsy Stamps was going to be doing a mini release this week. These cute cacti are so sweet!
I also made a video of the cardmaking process from start to finish, complete with a voice-over! A pretty cool feat considering there are 5 of us under the same roof all day long! You can find the video a little furthur down in this post.
Whimsy has released this set, Cute Cacti Clear Stamp Set, as well as co-ordinating dies and a matching paper pack. Today I have only used the clear stamp set and done a lot of fussy cutting!
The images were colored with a combination of Copic Markers and Polychromos pencils. Always complete your copic coloration beford using the pencils or you will ruin your markers. Copics first, pencils last is your motto!
Above you will find links to most of the supplies used to create this project. When available I use compensated affiliate links at no extra cost to you. By using these links, you help me to keep bringing you new projects and videos. Thank you!
Thanks so much for stopping by. I will do my best to make more cards and videos to share with you. Let me know if you have any requests!
Happy Friday! I am back with the next video for my Christmas Series 2018! I am on a crafting roll right now and am loving every minute of holiday creating! Today’s video is a little bit different but I hope you will enjoy it and that it might provide some useful tips and ideas for you to try to help make your holiday crafting fun and productive!
First of all, I want to share how I store all my stamp and die sets. This is not my original idea, but one that I many crafters use and I myself have been organizing my stamps and dies like this for a few years now. I purchase Avery Elle pockets that are the perfect size to contain most sets. I cut white cardstock to fit nicely inside and then slip the stamps inside in front of the cardstock and the dies behind it. Anytime I have images leftover from a project, I slip them right into the same pouch, ready to use the next time I am working with those particular stamps and dies. Lately, I have taken it one step furthur.
The idea actually occurred to meafter I had ordered some of thebrand new 2018 Mama Elephant products. As I waited for them and started to creatively think about what projects I would be making with them, I realized that I wanted to combine them with some of last year’s release. Since last Fall was crazy over here, I really missed out on a lot of crafting time and the Little Santa and Little Reindeer Agenda sets were sadly never opened. I got to work getting them organized into pouches and then realised that I could get a head start on my projects. What I ended up doing was stamping all of the images (at least twice), die-cutting them and coloring them. It is extremely gratifying to have all of these tiny images all ready to go!!! In my video I take you through all the steps that you too can incorporate into your crafting.
Stay tuned to see how I end up using all of these Little Agenda images. I have so many ideas! Subscribe to my blog or my youtubechannel to make sure that you don’t miss these fun projects! Until next time!
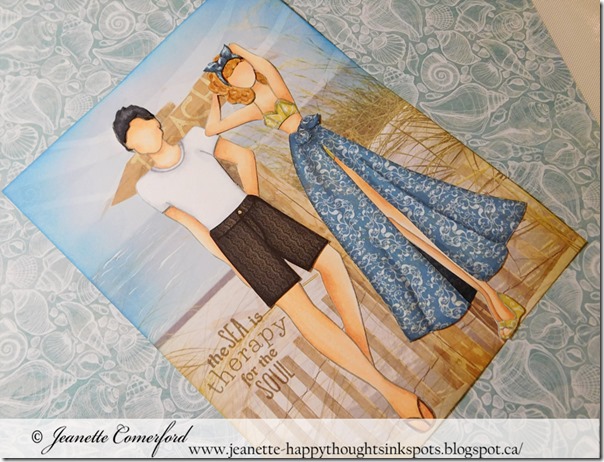
Happy Thursday! I had a wee bit of quiet time today in between shuttling around the younger boys. Almost caught up with the laundry as well…at least for now! So, I had time to edit the video I filmed while I made this Art Journal page. After posting my Cinderella themed one, I had a bunch of requests for more PAPER DOLLS! You can see the Cinderalla themed one –>HERE.
Creating these Art Journal pages with Paper Doll stamps is one of my truest forms of relaxation. I love creating a mood and a feeling with each of these pages. This one is beach themed and my Paper Doll is joined by a Paper Guy! I love the beach and so do my husband and our boys, so this one is truly inspired by how I always feel: Let’s go to the Beach!
The paper is still in stock! I was so happy and relieved to see that it was still available. I have the link below! It really was the perfect paper for my scene. I love how this sweet couple looks with it as the backdrop. The sentiment is one that I truly believe and it comes from another one of the Paper dolls. I stamped it with a brown that matches some of the elements in the background so it stands out enough but doesn’t look like it doesn’t belong.
I ended up adjusting the hair on the dolls after filming. I like how it fills in her face a little more and it really made the gus’ hair look more even.
Happy Thursday! I have a new card to share with you and a rather impromtu video to share as well.
When I was ready to die-cut my panel and finish up the card, I decided to film the process. No voice over, this was just recorded and then uploaded. Rather refreshing not to have to edit or do the voice-overs! I really wanted to share a little of the thought process that goes on during the cardmaking process!
For some reason, I just kept imagining this image with a moon behind it and so I attempted to create that scene. The moon shape was drawn on in pencil using a Spellbinders Circle die as my guide. The colors I chose were all either Blue of Blue-Green. I have all the copic markers listed below for you.
I used Whimsy Stamps Shaker Maeker Rectangle Die to diecut my colored scene. Then, I diecut it twice more using some black cardstock. I used the inner panels of the black cardstock to raise the center part up off the card. Everything was adhered to an A2 sized base in black cardstock. I chose black to that it would blend into the scene. I was thought that if I used white, you might see little peeks of it here and there.
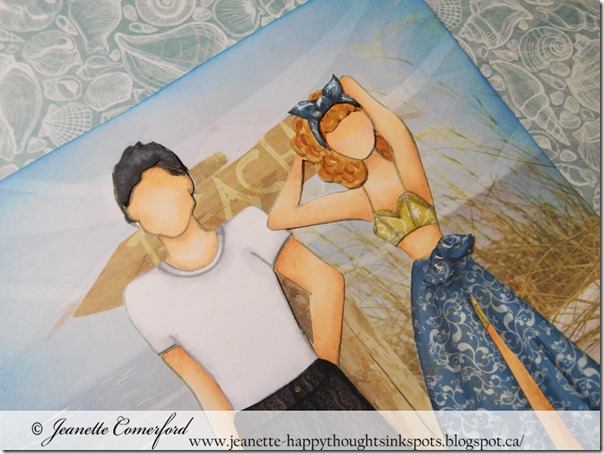
Just a few different angles so that you can see the raised portion and the effect it gives.
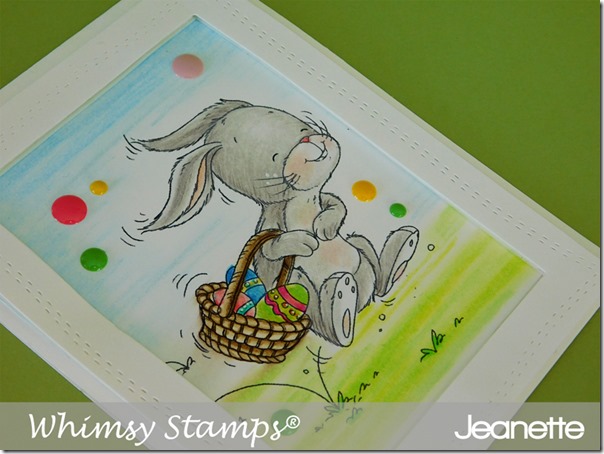
Happy Friday everyone! I have a new card and video to share with you featuring Whimsy Stamps. I totally adore all these gorgeous images from Marina Fedatova’s Fairy line. They are so sweet and delicate and they pair up just beautifully with all of Whimsy Stamps’ sentiments and especially their background stamps and stencils.
For this particular card, I was trying to channel Spring, as it has still not arrived here in Quebec. We just had another bout of freezing rain and woke up to snow on the ground….again. It is the middle of April and my kids are home because school had to be cancelled due to all the ice on the roads. Where are the tulips and buds on the trees? So, as I was saying, I guess I am going to have to try to create a little bit of Spring magic here in my craft studio and hope that it will soon appear for real!!
I had colored up this cutie and cut the Neenah cardstock to measure 4.0” x 5.25”. More and more, I am liking CAS cards (Clean and Simple). They really let the image be the star of the card. I did want to add some type of background but, truth be told, I felt too lazy to create a mask for the image. Then I realized that I could use the Farmhouse stencil and carefully sponge the ink around the image without adding ink on top of the image. I used 3 different distrss inks: Twisted Citron Distress Oxide, Peeled Paint and Mowed Lawn. This gave dimension and texture to all the leaves and made it seem like this little fairy and her bunny friend are nestled amongst some fresh, leafy greenery. By using the smaller sponge dauber as opposed to the larger ranger sponge blenders, I was able to be very precise in where I added the ink! I love how easy this was to do and how dramatically it transformed the image.
The last step was to add the sentiment. I picked a couple of the words from the Farmhouse Wreath Clear stamp set. I love the font and how easily you can mix and match the different words to create your own unique, personalized sentiment. The very last thing I did was to add some clear adhesive rhinestones for a touch of sparkle!
Thanks
for stopping by! I was happy to have the time and the energy to be a little bit more chatty. These last months have been hard on me and I have had no energy….it has been hard to stay on top of our lives, let alone write creative blog posts. Thanks for staying and sticking with me!
Happy Tuesday or should I say “Hoppy” Tuesday? Either way, I have a fun new card and video tutorial to share with you! This cute stamp sold out super quick but Denise just told me that it is back in stock! Get it quick while you still can!
Happy Wednesday! Hope your week is going well! We are STILL in the midst of kitchen renovations. We had one delay that has had a domino effect on all other work. At the moment we are at a stand-still waiting for some trades to finish so that others can do their thing. I just keep channeling positive thoughts because we are extremely lucky to be able to do this reno in the first place. Still, a kitchen renovation is really not for the faint of heart. Check out my instagram to see the progress!
Today I have a new project to share with you in my 2017 Christmas Series. It is for my December Daily album and is a two page design. The first page has a peek-thru to the next page. It was a piece that evolved as I was working on it and I used products from a TON of different compagnies! It is so fun to mix and match and create your own unique page! Without furthur ado, let’s get into it!
The paper for the front as well as the die cut sentiment were part of a December Daily kit (I think last year’s) that I hadn’t used yet. I am trying to use up all the extra pieces!
The window was diecut using a Memory Box die that I have had for so long. There are matching shutters and I flower box that match. I ended up using the frame and the box only. The window box was “dressed” up by using a Martha Stewart leaf craft punch (also super old) to create some evergreen boughs. It adds texture and interest to the page and a nice pop of color to off-set all the red!
I love that you can see the little girl through the window. It just invites you to turn the page!
This scene took on a life of it’s own as I just continued to add layer after layer. It is so rewarding when all the different components that you have pulled out of various stashes all come together to form a perfectly matched scene! (It takes a little patience too, but it is worth it).
The sentiment was one of the last things that I added and I am so happy with how it matches the exact mood of the page. This reminds me of how I felt on a Christmas evening; warm, cozy, sleepy, safe and loved.
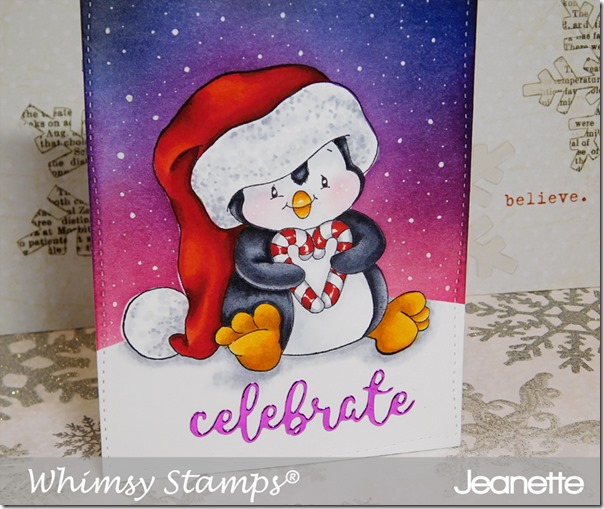
Happy day! Hope you are having a good day. I have Day #3 in my 2017 Christmas Series to share with you today and it features one of Whimsy Stamps’ signature penguins. This cutie is adorable with his over-sized Santa hat and his heart-shaped candy-canes. I created this with my December Daily Album in mind. I will either add him to one of the 4x6” pockets or create a 6x8” page and use him as the focal point.
I think what makes this image really pop is the background that was created with Distress Inks. Kristina Werner used these exact colors to create a background for one of her cards(you can see it here) and I thought the effect was so stunning that I used her color palette for my penguin. Adding the white dots with a gel pen makes the background extra special and it always amazes me to see what one small detail can do to elevate the entire project.
I had foiled paper in the exact shade of magenta and I think the die-cut word just finishes it off perfectly.